Building the Structure: Sharepoint Lists
Many consider Sharepoint Lists to be just that - simple lists. In fact many use Sharepoint as a place to file documents in a central location, and only do the basics with the List functionality because it seems to be limited.
At first glance, it does look unimpressive, with the default To-Do list and a few others. However the power of Sharepoint is that in reality the whole system is a database, and every List is actually a Database Table. And as a platform, Sharepoint provides many features for working effectively with the data in these lists (sorting, filtering, views, search).
But what can you do with a table? Not much, on it's own - but when you realize that you can add custom fields that are lookups into other lists, what you now have is the basis for defining your own database schema in Sharepoint, using multiple inter-related lists. And once you add custom workflows, the possibilities are endless.
In the last segment, we identified several key information types that we wanted to track.

Near the top right of your screen in Sharepoint, you will see a blue "Site Actions" button. Click on "Site Settings". You will then see the following screen:


In the Create screen, you will see a section titled "Custom Lists"


Note:
There are actually more lists that will be added as we work through, such as lists that contain status codes and additional information about processing those status codes.
However for simplicity, we will stick with the main lists above for this discussion as the principles are the same.
Tip: You can define Choose values as field types, but these should be limited - it is preferable to define additional Lists for supporting multiple value drop-downs, as they are then more easily extended. Also, if you need to change the names, you would have to script mass-assign updates if you had used a Choose field, where with a Lookup into a supporting list, the change is only made once.
Where it all begins - the "Root" List
The key object, or List, in our system is the Project. Once all of the main list objects have been created, we can begin to link them together by adding custom Lookup fields, named logicially to describe the list being linked to:


From the other list, you will need to specify the field you are linking to. By default, the primary "key" field is already shown by default.

Note: Until you have your workflows created, all additions and linking will be done manually. In particular, you only want to define "doubly linked" lists when one of those list items will be created automatically, as then the workflows can maintain the linkages in both directions for you.
Lather, Rinse, Repeat - Adding the other linkages
At this point, you should define all of the linkages from each "key" list to the other lists as defined in your linkage diagrams. We showed the linkage for the main Project list, above, but the other lists also have relationships to other lists, including back to the main Project record. Keep in mind that we already have plans to use Workflows to help maintain the linkages between lists, so don't be overly concerned yet about all of the cross relationships.
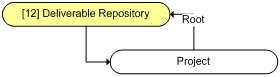
Here are the other relationships that need to be defined between the other lists. In each case the "root" list of the diagram is on the top, in yellow.
Project Assignment
The Project Assignment will be the main point of contact for each team member. It will contain information about the assignment, status, due dates, and fields for updating estimated completion dates in the main project record, actual completion dates, journal notes, etc. This is also the point of entry for time on the project, consisting of the hours worked on the specific assignment (to date, or at completion if a short task), billing notes and effective date for the time entry.

Customer Record
The customer record is used in every project (projects are for customers, after all), and also contains relevant contact information, server information, attachments etc.

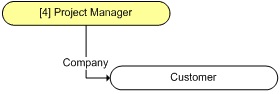
Project Manager
The Project Manager in this instance is associated with a particular customer. (i.e. the customer's project manager, not ours).
Calendar
Every system needs a calendar, and in this case, it will be used for manual entries like vacation, as well as automatic addition of consulting or training assignments, for visibility to the team.

Time & Notes Log
This list records all time entry (billable or not) as well as any journal notes associated with a project or assignment.
Transaction Log
The Transaction Log records all key changes of information:
- Status
- Ownership
- Estimated hours
- Creation of assignments
- any other information you feel it is relevant to capture and keep for historical/audit purposes.
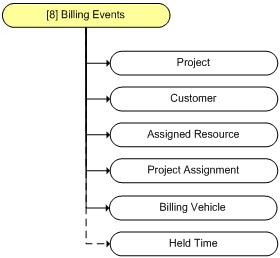
Billing Events
This list will be populated automatically by T&M time entry events, or project completion for Fixed Price work. This will be reviewed and used for invoicing; it contains relevant fields for matching invoices to work billed, and "processed" flag.
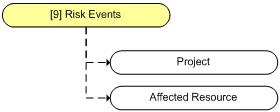
Risk Events
In our model, we want to track overages, and on Fixed Price projects with a "risk buffer", we want to administer approving tapping the "risk buffer" for paying out overages to team members (within the overall project limit).
Held Time
For T&M work, it is important to never over-bill. So the system will keep track of the invoice limits on each work item, based on the estimate. For certain types of T&M work, the hours are partitioned within the project with sub-limits, so that if multiple resources have specific tasks on a project, one cannot "take" hours from another team member. If any time is recorded in excess of the specific limit, it becomes "Held" for later review.
In addition, in the initial stages of a project, pre-PO, hours can be tracked prior to having a billing vehicle in place, so they can be addressed when (and if) the project gets the go-ahead.

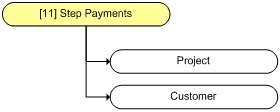
Step Payments
For larger Fixed-Price projects, step payments may be built-in based on event thresholds. This provides the ability to break the overall project up into smaller fixed billing chunks, which can be invoiced separately when those events occur.
Deliverables Repository
All work output will be stored here. During the creation of the advanced workflows, automatic creation of a fixed folder structure in the Repository (triggered by project state) was developed.
All Done!
Next time we will look at designing the workflows required to manage and maintain the data in the lists, as a status-based workflow model. Implementing the actual workflows begins in Part 5.
Coming next:
Part 4: Process Workflow Design
Part 5: Implementing Custom Workflows with Sharepoint Designer
Part 6: Advanced Workflows with PowerShell
Part 7: Hosting tips, Email & Notifications
Part 8: Doing it Yourself - Recommendations
Part 9: Using what you've built - more free enhancements
Go back to:
Part 1: The Need
Part 2: Designing the Solution
For more information or questions, contact:
Gary Nelson
No comments:
Post a Comment