Search This Blog

Thursday, September 29, 2011

Sharepoint Part 3: Custom Project Systems on a Shoestring

Develop your own project systems using Free Tools, just add labor


Building the Structure: Sharepoint Lists
Many consider Sharepoint Lists to be just that - simple lists. In fact many use Sharepoint as a place to file documents in a central location, and only do the basics with the List functionality because it seems to be limited.


At first glance, it does look unimpressive, with the default To-Do list and a few others. However the power of Sharepoint is that in reality the whole system is a database, and every List is actually a Database Table. And as a platform, Sharepoint provides many features for working effectively with the data in these lists (sorting, filtering, views, search). 


But what can you do with a table? Not much, on it's own - but when you realize that you can add custom fields that are lookups into other lists, what you now have is the basis for defining your own database schema in Sharepoint, using multiple inter-related lists. And once you add custom workflows, the possibilities are endless.


In the last segment, we identified several key information types that we wanted to track.
As we start to build our structure, the first thing we need to do is create each of our main lists. You will need a Site Administrator type account for this.


Near the top right of your screen in Sharepoint, you will see a blue "Site Actions" button. Click on "Site Settings". You will then see the following screen:
Under Site Administration, click on "Site Libraries and Lists"
On the next screen, click "Create New Content".
In the Create screen, you will see a section titled "Custom Lists"
Click on "Custom List". You will then see the following page:
Type in the name of the list, a description if you like, and click Create.
You will now have a simple list, with a few basic fields. You will next want to add custom fields to your list, representing what you want to record. See below for instructions on adding custom fields.


Note:
There are actually more lists that will be added as we work through, such as lists that contain status codes and additional information about processing those status codes. 


However for simplicity, we will stick with the main lists above for this discussion as the principles are the same.


Tip: You can define Choose values as field types, but these should be limited - it is preferable to define additional Lists for supporting multiple value drop-downs, as they are then more easily extended. Also, if you need to change the names, you would have to script mass-assign updates if you had used a Choose field, where with a Lookup into a supporting list, the change is only made once.

Where it all begins - the "Root" List
 The key object, or List, in our system is the Project. Once all of the main list objects have been created, we can begin to link them together by adding custom Lookup fields, named logicially to describe the list being linked to:
We join lists by adding a Lookup field under the List Settings. Open the list you want to add fields to (with an account with suitable permissions to manage the lists). Select Settings>List Settings.
As you scroll down the List settings page, you will see a section called Columns. At the bottom of the list of current fields you will have the option to "Create Column".
Next, you will see the Create Column screen. Specify a name for the column that refers to the list you are linking to - ideally, a column with the same name as the other list. Choose "Lookup" as the type, and then choose the list you want to link to.
Tip: Add a description as well.
From the other list, you will need to specify the field you are linking to. By default, the primary "key" field is already shown by default.
Now the lists are linked. If you need to link back from the other list to this one, add corresponding fields in the other list, pointing to this one. 


Note: Until you have your workflows created, all additions and linking will be done manually. In particular, you only want to define "doubly linked" lists when one of those list items will be created automatically, as then the workflows can maintain the linkages in both directions for you.


Lather, Rinse, Repeat - Adding the other linkages
At this point, you should define all of the linkages from each "key" list to the other lists as defined in your linkage diagrams. We showed the linkage for the main Project list, above, but the other lists also have relationships to other lists, including back to the main Project record. Keep in mind that we already have plans to use Workflows to help maintain the linkages between lists, so don't be overly concerned yet about all of the cross relationships.


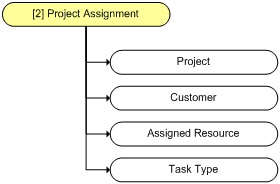
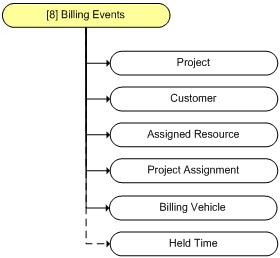
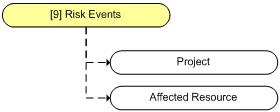
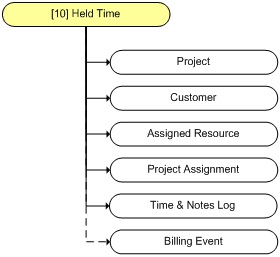
Here are the other relationships that need to be defined between the other lists. In each case the "root" list of the diagram is on the top, in yellow.

Project Assignment
The Project Assignment will be the main point of contact for each team member. It will contain information about the assignment, status, due dates, and fields for updating estimated completion dates in the main project record, actual completion dates, journal notes, etc. This is also the point of entry for time on the project, consisting of the hours worked on the specific assignment (to date, or at completion if a short task), billing notes and effective date for the time entry.

Customer Record
The customer record is used in every project (projects are for customers, after all), and also contains relevant contact information, server information, attachments etc.


Project Manager
The Project Manager in this instance is associated with a particular customer. (i.e. the customer's project manager, not ours).


Calendar
Every system needs a calendar, and in this case, it will be used for manual entries like vacation, as well as automatic addition of consulting or training assignments, for visibility to the team.

Time & Notes Log
This list records all time entry (billable or not) as well as any journal notes associated with a project or assignment.


Transaction Log
The Transaction Log records all key changes of information:
  • Status
  • Ownership
  • Estimated hours
  • Creation of assignments
  • any other information you feel it is relevant to capture and keep for historical/audit purposes.

Billing Events
This list will be populated automatically by T&M time entry events, or project completion for Fixed Price work. This will be reviewed and used for invoicing; it contains relevant fields for matching invoices to work billed, and "processed" flag.


Risk Events
In our model, we want to track overages, and on Fixed Price projects with a "risk buffer", we want to administer approving tapping the "risk buffer" for paying out overages to team members (within the overall project limit).


Held Time
For T&M work, it is important to never over-bill. So the system will keep track of the invoice limits on each work item, based on the estimate. For certain types of T&M work, the hours are partitioned within the project with sub-limits, so that if multiple resources have specific tasks on a project, one cannot "take" hours from another team member. If any time is recorded in excess of the specific limit, it becomes "Held" for later review. 
In addition, in the initial stages of a project, pre-PO, hours can be tracked prior to having a billing vehicle in place, so they can be addressed when (and if) the project gets the go-ahead.


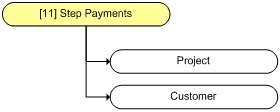
Step Payments
For larger Fixed-Price projects, step payments may be built-in based on event thresholds. This provides the ability to break the overall project up into smaller fixed billing chunks, which can be invoiced separately when those events occur.
 

Deliverables Repository
All work output will be stored here. During the creation of the advanced workflows, automatic creation of a fixed folder structure in the Repository (triggered by project state) was developed.


All Done! 
Next time we will look at designing the workflows required to manage and maintain the data in the lists, as a status-based workflow model. Implementing the actual workflows begins in Part 5.


Coming next:
Part 4: Process Workflow Design
Part 5: Implementing Custom Workflows with Sharepoint Designer
Part 6: Advanced Workflows with PowerShell
Part 7: Hosting tips, Email & Notifications
Part 8: Doing it Yourself - Recommendations
Part 9: Using what you've built - more free enhancements


Go back to:
Part 1: The Need
Part 2: Designing the Solution


For more information or questions, contact:


Gary Nelson

Wednesday, September 28, 2011

Sharepoint Part 2: Custom Project Systems on a Shoestring

Develop your own project systems using Free Tools, just add labor

Designing the Solution
In Part 1 we discussed the need for a custom project system. Your needs may be somewhat different than ours, but many of these ideas may apply to you or be a useful reference as you consider building your own custom system.


Requirements first! 
Based on your prior experience, interviews with your team, stakeholders and other inputs, you will come up with a comprehensive laundry list of what you need your system to do for you. Because that is what it is for - to serve a need, make your work and projects easier to manage. You want to build something that works as you need it - not try to shoehorn your processes into something that does not fit. People will get frustrated and not use it. So make sure you consult the people who will be using the system.


Our laundry listed included the following:


Project/Deliverable Tracking through the full lifecycle

  • Project Initiation & Planning
  • Project Execution/Delivery
  • Acceptance Testing
  • Project Closeout/Acceptance
  • Warranty
  • Accommodate both Service and Deliverable based work

Time Entry, Billing and Invoice Support

  • Time entry for short and long duration tasks
  • Ability to capture (and recover) pre-PO time spent
  • Support client billing requirements
  • Weekly client billing
  • Roll-up statistics, filtering, searching etc.
  • Support for reconciling invoices with client time system
  • Associate with Purchase Order, SOW and Contract

Keep it simple - Single points of team interaction

  • Projects administered by PM
  • Team members work with Assignments under Projects

Many custom views per list, all filterable using built-in Sharepoint capabilities


  • Projects by status type
  • Assignments by owner / status type
  • Billing Events by processes status
  • And dozens more, growing as needed over time

Custom workflows to automate the processes and keep things moving
  • New Project
  • Updated Project
  • New Project Assignment
  • Updated Project Assignment
  • Held Time Update
  • New document
  • Processed Billing Event
  • Email notifications
Automated Scripting (Manual and in Workflows)
  • Create document folders/files with metadata (links to Projects)
  • Updating assignment resources based on change of project resources
  • Cascade cancelled projects to "close" assignments etc.
  • Other maintenance and update scripts to manage Sharepoint
And many more details.


Ok, you have the list, now what? Don't start developing just yet.


Model it!
How does the laundry list fit together? You need to make a model of you you see things working together, what information needs to be collected, how status changes, how information needs to be exchanged, etc.


Not sure where to start or how to design a good process model? You may know a good business analyst who can do this, or an experienced process designer.


Steps:
1) Map out the high level design ideas - i.e. the Big Picture. Use mind-map software, or pen and paper.


2) The information and process model needs were then broken down into logical “object” type groupings, each of which would become a custom list in Sharepoint, which would be linked to other lists during development. 


3) The workflow was diagrammed out, and the process states defined accordingly. 

Here is a series of process workflow diagrams we used to map out our processes, covering the different transitions and work types. (There will be a more details on implementing the workflows in Part 4).


Project Initiation Phase
This phase covers the initial efforts required to bring a potential project from concept through to formal estimate. Note that depending on the engagement, the customer may be writing requirements, or we will as a billable service.


Project Execution: Service Model 
This supports both immediate and scheduled future assignments such as training engagements or on-site consulting services.


Project Execution: Deliverable Model
This phase covers the primary activities in deliverable-based projects, including internal QA cycles prior to customer delivery. This phase completes with the first deliverable hand-off for customer testing.


 Project Execution: Acceptance Testing
This phase encompasses the customer test/vendor revision cycles, through to project/deliverable completion and acceptance.

 Warranty Work
With deliverable based projects, there is a limited warranty period, and this workflow supports the ability to track warranty work separate from normal test/revision cycles.


Coming next:
Part 3: Building the Structure: Sharepoint Lists
Part 4: Process Workflow Design
Part 5: Implementing Custom Workflows with Sharepoint Designer
Part 6: Advanced Workflows with PowerShell
Part 7: Hosting tips, Email & Notifications
Part 8: Doing it Yourself - Recommendations
Part 9: Using what you've built - more free enhancements

Go back to:
Part 1: The Need

For more information or questions, contact:

Tuesday, September 27, 2011

Sharepoint Part 1: Custom Project Systems on a Shoestring

Develop your own project systems using Free Tools, just add labor


Introduction
There are many Project Management tools on the market, and a few “gold standards” – MS Project, MS Project Server, to name a few – and they can be expensive. But what if you have a small budget (or “no budget”)? How can you easily develop a system that works well for high-volume, smaller projects using freely available tools, a little ingenuity, and a good dose of elbow grease?


That was the challenge – develop a system to support the full lifecycle of tracking projects and deliverables from conception/estimate through to invoicing and beyond, using stable, freely available web-based systems and tools – and design it to scale to support Programs as well as individual projects – for little to no cost except labour and one server PC.


Starting with a small server running Windows Server 2008, we customized Windows Sharepoint Services 3.0 (WSS - the free version) to create a full-featured workflow-based project deliverables tracking system that included automated assignment emails, time entry and client invoicing support among other features – with no software costs.


This series is a case study of the process and stages we went through to develop this system, highlighting the freely available add-on tools, techniques and some requisite skills that were required, and tips on developing your own Sharepoint WSS-based solutions for those with a smaller (or no) budget.


The Need
We were transitioning a team of seven contractors from being directly contracted to the main customer, to these contractors all working through a small outsourcing company – effectively bringing all of the Customization team under one virtual roof, providing services to the main customer and all of their clients. As of January 1, 2010 there was the immediate need to be able to track, manage and invoice for all of the projects/deliverables under the new entity. 


There was an interim period of managing through spreadsheets, but it was known from the start that we would need a reliable and flexible system to manage all of these projects/deliverables – from the one-off projects for smaller customers to hundreds of development projects for a single end client (managed as a program). Projects ranged in size from as little as 8 hours up to 200+ hours, with the average being around 60 hours – and an average of 400 potential projects per year. The other services we provided also needed to be handled under this new system, including training and on-site and remote consulting.


Further, the team was literally spread across the planet, so a web-based solution accessible through the Internet was a key requirement. We also wanted to incorporate many lessons learned over the past 9 years in delivering these types of projects. This was the perfect opportunity to build things right from the start – but with almost no development budget, this was definitely a lean project – but also critical to the business. Core features were therefore developed first – and then additional functionality was added as needs grew and time went on.


Requirements
There were many items on the wish list, which were then prioritized and implemented in a staged fashion over the first 6 months.

Stage 1
- Provide full life-cycle support (discovery/proposal, development, acceptance testing,  etc)
- Need for detailed tracking of projects – including estimated & actual hours 
- Unique, automatic numbering of all items
- Support  high volume, short duration projects
- Support geographically dispersed team 
- Support various services and deliverable projects
- Support estimate tracking
- Project / Project Assignment model
- Support multiple resources associated with deliverable, by role – and billable
- Multiple stage date tracking
- Multiple client support
- Email notifications
- All with a minimal startup-budget solution and no ongoing planned third party software maintenance costs


Stage 2
- Time entry system driving invoicing
- Support T&M, T&M-Cap and Fixed Price projects
- Support different billing timeframes based on billing type (weekly/deferred)
- Support step payments on Fixed Price deliverables


Stage 3
- Document/deliverable repository system linked to projects (with additional linked reference fields)
- Prevent over-limit billing (log as Held Time for later disposition)
- Track preliminary effort prior to project execution for later billing if project proceeds [this used to be lost effort – not consistently recorded]
- Track warranty work


The Platform
The decision was made to utilize Windows Sharepoint Services 3.0 (free with Windows Server 2008 license). One server was purchased for this task. Implementing the solution with minimal cost required a lot of digging around the internet, and we incorporated the following into the implementation:


Free Tools/add-ons used:


Coming next:

Monday, September 26, 2011

Project Communications: Cutting through the noise

[Also available as a Podcast]

Who's got the Monkey?


Email is one of the primary tools on projects, and is used extensively. As a result, personnel on the project may receive literally hundreds of project emails a day each, particularly the Project Manager. All of these emails are important to the project, however we all need to be careful to ensure that messages are targeted and tagged appropriately so that:


(a) the right people are looking at the messages
(b) people are not overwhelmed
(c) tasks are not delayed (the right people are reading and taking action)
(d) things do not fall through the cracks (no monkey/too many monkeys)

(Note: The person with “the monkey (on their back)” is the responsible person for the task/item).

General guidelines

Here are some tips that I have used on numerous projects that have saved frustration and hours of wasted effort in communicating on projects. The key is to keep things simple, so they become automatic habits. Make a system difficult, and people will not use it.

(1) Have only one responsible person (he/she who has “the monkey”). Only one person should be in the "TO" line, the person responsible for actioning the email. Others who "need to know" but are not responsible for the action should be in the "CC" line.

Sometimes, you will need to have more than one "Monkey", where decisions will require input from a select group. In this case, by all means include them all in the TO: line - but make it clear what is expected of them in the email, and by when. And if different people have different tasks, highlight them early in the email, ideally in the first page, so they know to read on further. Don't leave the assignment "hooks" until the end. Most people will skim and stop reading before they get there.

(2) Make sure that people who "need to know" are CC'd. This usually includes the Project Manager(s), Team Leads, the people involved in cross-functional activities, etc. If you are CC'd, you know you do not need to take action right away, and can read at your leisure - if you need to take any action at all. As you do not have the "monkey", you are not the primary party responsible. Some topics are general awareness - you can then skim topics, vs need to know the details and read for full meaning.

(3) "Tag" emails appropriately with urgency information. If you all share the same email system on the project, there are often automated tools and rules that you can use in common, such as Exchange with Outlook. However, that is not always the case, and I have found that simple is best.

In order to help filter out reference (FYI) emails from actionable emails, you can use something like the following at the beginning of the SUBJECT line:

"A:" - Action.
"U:" - Urgent (with "!" importance flag)
"I:" - Informational
“TNT:” – Today, Not Tomorrow (all hands on deck / stop drop and roll urgency)

(4) One thread, one subject, one topic. Most mail programs have threading capability, and it makes it much easier for tracking through old emails on a topic if the subject actually relates to the content - and the subject line is maintained throughout the thread. This simple convention can literally save hours "trying to find that email back from April - or was it February?"

And it goes without saying - do not respond to topic A under Subject B. Start a new thread or respond to the correct email. Keep the threads clean, and in context.

(5) One-touch handling. If you read it - action it, or delegate it and pass it along. If you need to action it yourself but cannot do it right away, flag it in a manner that you will not lose it. I re-mark those items "unread" and it seems to be effective for me, however you may have a different style. I would caution on filing items "out of sight" as those items are likely to be forgotten unless you check those folder(s) at least once daily. (Out of sight, out of mind)

And most importantly - 
(6) Get the team to buy in early, and use the same conventions and rules on communicating. It may be a short learning curve, but well worth it, as the above tips will help streamline your communications, letting you focus on delivering your project effectively, and less time "trying to find that email" or missing deadlines because someone did not know they had a task to do.

And of course - tweak it to suit your project, but keep it simple.

Good luck with your project!

Saturday, September 3, 2011

Everywhere is Local: Providing seamless local access for clients, and stay connected globally - Cheaply!

[Also available as a Podcast]

Want to learn how to keep your business communication costs down, and solve the problem of staying in touch when you travel, without roaming, and without changing phone numbers?


Want to make it easier for your key clients to contact you, when those clients are long distance or overseas?


Want to travel overseas for a couple weeks, stay in touch and call family at home - for as little as $40 a trip?


These days it is possible to do this, and there are a number of options available, but I will tell you how with the methods and systems I use.


But first, the requirements. Note that I live and work with this every day, living where I want to and serving customers "locally" around the globe.


Business Requirements:
#1: Local access for clients to contact you - domestic, long-distance and overseas customers
#2: "One number" for your clients to contact you, no matter where you are
#3: Have all calls follow me when I travel - without roaming
#4: Save money. Lots of it.


How can we accomplish this - and for only hundreds, not thousands, a year?


Setting it up at home
Step 1: Signup for a VOIP provider like Skype. There are more and more out there, but compare features and cost to see which works best for you. The VOIP provider will be the hub for your communications. Choose a plan that works for you - I personally use the annual Unlimited Plan for around $100USD which provides calling to over 31 countries for no additional charges beyond your annual plan.


*(Calling mobiles in some countries can incur charges, that is up to the mobile provider in those countries. So keep some funds available in your Skype account for these occurrences, or signup for auto-top-up)


Step 2: Setup an inbound number (Skype-In) in each of the key countries you have key customers. Skype lets you have many inbound numbers for one account - for example, I have a NZ inbound number and a US number, for local and North American clients. Each inbound number costs about $30US/year with your plan.


Step 3: Receiving the calls. You need to setup forwarding from Skype to your main work number or mobile phone. Of course if you have Skype running on your PC you can answer the calls there before it forwards to your other phone. And if you have Skype on your smartphone (needs your data plan), you can receive the calls that way too.


Step 4: Tell everyone your new Skype-In number(s). Give your US clients the US number, your UK clients your UK number, give your local clients your local Skype-in number, all of which come to you through Skype.


Stop publishing your actual fixed numbers - this will become important, as you will see in the next steps.


Step 5: Calling your clients. With your VOIP plan, you can now call your clients overseas for little to nothing above your annual plan - especially if you call land lines. But - what about when you are out of the office, away from your PC, or don't have Skype on your smartphone?


Skype also provides, for free with your subscription, Skype-to-Go access numbers in as many countries as you need, where you can call a local access number and then call through Skype on your plan to any of your eligible countries. So the costs are limited to your local mobile call.


Getting away from it all - Travel
Travel without roaming. Seamlessly. Really!


Step 1: Unlock your GSM mobile phone (has a SIM card) and make sure it is Quad-band so all countries are covered. Note - if you live in NZ this may already be the case - few mobiles are locked there.


Step 2: Before you board the plane, forward your "home" mobile to your local Skype-In number, so people who call your mobile at home will still be able to reach you.


Step 3: Buy a local Prepaid SIM (or microSIM for iPhone4) in your destination country. Get your best deal with local providers there - and if you do regular trips there, keep the SIM for your next trip. You can usually buy these right at the airport - so no need for delays in being connected, even if on your first trip.


In the US you can get 10c/min prepaid plans, and sometimes free evenings too. You can also add on casual data options. I pop in my US SIM before I land so that I am connected as soon as I get off the plane.


Step 4: Change your Skype forwarding to your new (temporary) local SIM phone number. Now, everyone who calls your Skype-In number gets forwarded to you - seamlessly.


Step 5: Calling. When calling clients in the visiting country, just use your mobile. Do remind them to not save your temporary number -just your published Skype-In number. When you need to call anywhere else - home, or clients in another country - lookup and use another Skype-to-Go access number wherever you are, and use that to make calls - again, for little to nothing more than your local usage minutes, or if from a land-line, free.


Step 6: When going home, remember the prepaid SIM is temporary - you don't want to forward it anywhere.
However, in the event someone did save it from callerID, you may want to leave a message to call your Skype-In number instead of leaving a message (that you may not get until your next trip).


Before you get on the plane, set your Skype forwarding to the next destination (home, or the next stop on your trip). When you get on the plane, swap SIMs for the next destination.


Step 7: Finally, and don't forget this step! When you land at home, turn OFF forwarding on your mobile phone (with your home SIM plugged in).


I hope this helps you too - it has saved me thousands every year.


Good luck, and Be Local!


Gary Nelson, PMP
Gazza Consulting Services